Showing posts with label finished quilts. Show all posts

Jul 30, 2012

Great Granny Table Topper

This was such a fun little quilt to put together, it measures about 45" X 45".
As I showed you last week, I finished all nine blocks.


I didn't take any photos of sewing the sashing and the borders.
I sandwiched the quilt top, the quilt batting and the backing and pinned it all together with curved safety pins.
I use safety pins on small projects because I can't stand basting!


When I first started quilting, I quilted by hand.  After a few quilts, I realized that even using a thimble my fingers were so sore that I didn't have any feeling in them.  I thought it was best to machine quilt.  I really love this process.  I look at the quilt for a few minutes and determine what method of quilting I should do.  I felt that stitching in the ditch wouldn't take away from the beauty of the fabric in the squares.  If you don't know what stitching in the ditch is, it is stitching on the seam line.


After all the ditches were stitched, I outline stitched each square.


The quilting is finished!


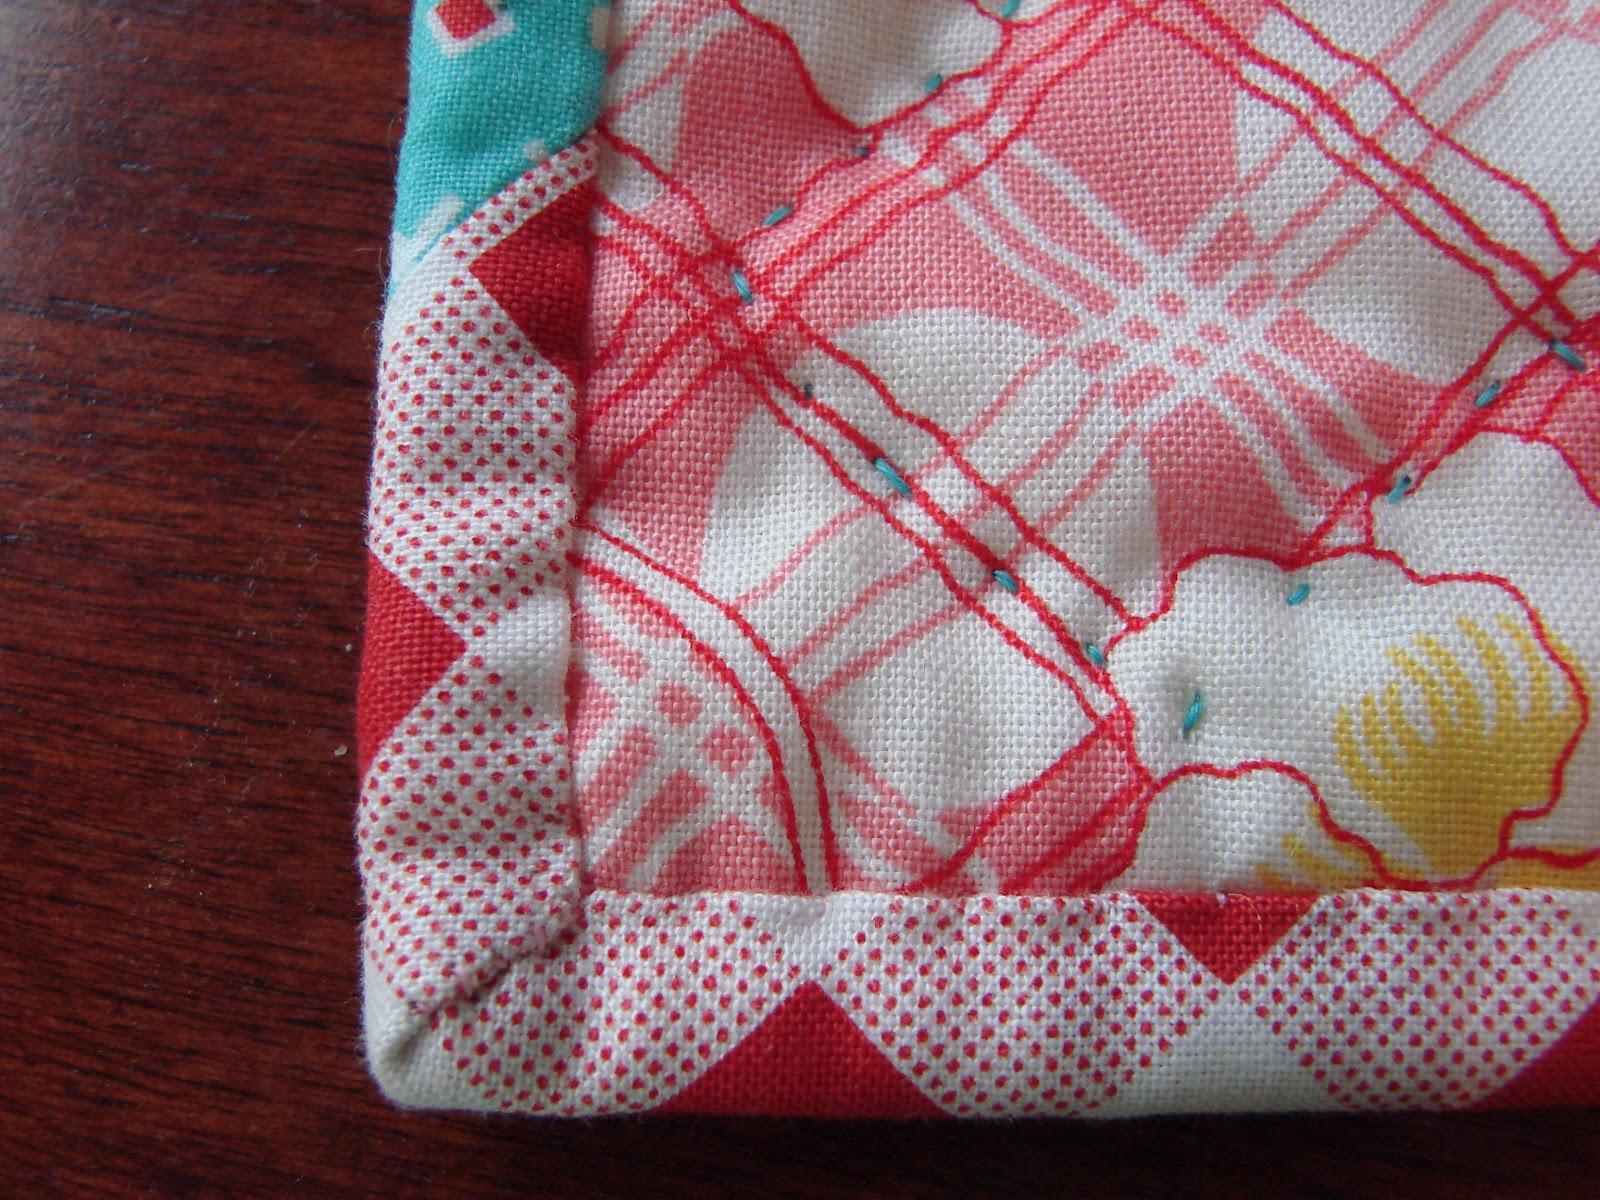
I bought a beautiful Amy Butler fabric for the back of my quilt.  I wanted a bright color for the binding, to keep the theme of the colors in the squares.  I picked an aqua polka dot out of my stash and auditioned it with the Amy Butler fabric.  I like it.


I have a Robert Kaufman app on my smartphone which I use for calculating the binding.  It told me I needed 5 strips for my binding. I cut the strips and sewed them together and pressed them in half.


Now I'm attaching it to the quilted quilt, using the method I showed you in my binding tutorial part 1 and part 2.


The table topper is finished :)


I decided to sew little circles on the sashing and borders of the quilt.
Here are some closeup photos.


I love the back of the quilt!


See how the stitching in the ditch shows up on the back?


I love finishing a project.  I put in it various areas of the house and admire it as I walk by!  Am I weird?  lol


post signature

Jul 20, 2012

Binding Tutorial, Part 2

I hope you read my binding tutorial, part 1.  It can be found here.
After I have attached the binding to the front of the quilt, I hand sew it on the back.
There are a few tools of the trade that I always use for this.
Scissors, quilting thread, needle and pins.


I pin the binding on the back, so that the binding hugs the quilt, and the machine stitching is hidden.


I thread my needle with a single thread and knot the end. Then I use a blind stitch. Take a small bite out of the fabric on top (binding).....


.......and take a few fabric threads from the quilt (pink fabric), directly below where you took a stitch in the binding.  Then take another stitch in the binding, about a centimeter or 1/4" away from your previous stitch.  


Now we're coming close to the corner.


Pin around the corner, the miter takes its shape naturally because of the method it was sewn in part 1.  Help it along by pinning.


I take little stitches along the miter seam in the corner, going down and then coming back up again.


Continue on your merry little way, stitching until you're finished.


Now turn the quilt over and admire your handiwork.


This is my favorite method of attaching binding.  The corners look perfect every time.


Pretty on the back too.


I hope you have enjoyed the tutorial, and even found it helpful.


I always look forward to binding my quilts.  I can grab my tools, stretch out my legs and hand sew while I watch or listen to the TV. 


My little quilt is colorful, do you think it looks good on the chair?


My cute little "grandmother" looks nice on the mini quilt. My mother sculpted her.  She has a faraway, pensive look in her eyes.  She has lived a rich life and when she sits down to sew all of the many warm memories of children and grandchildren and friends flow through her mind as she thinks and quilts.
She looks kind of sad though, maybe all she has left to keep her company are her memories and her quilts.....


post signature

Jun 29, 2012

Slide Show


I have always liked Terry Atkinson's quilt patterns.  The cutting instructions are simple and easy to follow.  I have made the "Yellow Brick Road" pattern numerous times and have recommended it to beginner quilters.  I saw this "Slide Show" pattern at the quilt shop and envisioned lots of possibilities!  I wanted to make a quilt to match the colors in Lindsay's (my daughter) craft room.  She decorated her craft room in red and mint green.  I will have to blog about her craft room soon...

I added stars in the corner, because I love stars :)


It was a lot of fun choosing the fabrics fore this quilt.  Do you notice how pretty the machine quilting is?  Thank you Cindy Paulson :)


This is the time that I used white as a background in my quilt.


I was able to choose large prints for the squares, so I was really careful in choosing the fabrics.  The same prints were used in the little squares.


I bought the green floral for the back, but used leftover pieces of the prints I used on the back.  I always think it makes the quilt more interesting.  


I hope you have been inspired to think about making a Slide Show of your own :)


post signature

May 28, 2012

Thanksgiving Dinner quilt

This is one of my favorite quilts, it is so much fun to hang it on the wall every Thanksgiving, through the Christmas holidays.


This quilt was designed by Lori Holt from Bee in my Bonnet.
Notice how the border looks like turkey feathers :)


It comes complete with the turkey and all the fixings.


The quilt is all applique and embroidery.  It took a while to applique the letters!


I cut off the mashed potatoes in the photo, but you can see the potato masher, the cranberry jelly and Grammie's gravy.  My mom made the best gravy from scratch with the turkey neck and some of the insides.  I can barely stand to look at those things, let alone touch them!


The pies, oh the pies!!!  Jordan makes a killer pecan pie tart and sweet potato pie.  Kim's favorite is pumpkin pie.  Rebecca's favorite is harvest fruit nut pie.  Lindsay makes a different specialty every year.  Our family loves key lime pie, but not usually for Thanksgiving.  I really like the traditional French Canadian sugar pie, and another Canadian favorite, rhubarb.  Vanessa made her first pie ever last Thanksgiving and it was a difficult one, Harvest Fruit Nut.  It was superb!


I think that Lindsay made the two pies on the left, Jordan made the one on the top right, and I made the pecan one on the bottom right.


I could go on and on about the pies....Jordan made the pecan pie with the crushed pecan tart shell on the left, Lindsay made the pumpkin pie covered in whipped cream with the cinnamon swirl crust pictured on top, Vanessa's first pie, the Harvest Fruit Nut on the top right even with a pastry heart!  Jordan also made the sweet potato pie with the meringue top, on the bottom.


Do you see the cinnamon swirls on Lindsay's pie crust?


What Thanksgiving dinner isn't complete without homemade stuffing in a vintage pyrex dish with pink embroidery :)


All of our Thanksgiving dinners include our favorite family recipe, Mushroom turnovers.  For those of you who don't like mushrooms, they don't even taste like mushrooms, they are just plain rich and delicious.


I didn't get a photo of the rolls block, but you can see it on the quilt.    The rolls are on the blue pedestal.


Oh, the turkey!!!  La piece de resistance!  This turkey is appliqued with basil leaves and cranberry buttons!!!  


Jordan is the expert "deep fryer turkey cook" in our family.  I think this turkey was Rebecca's specialty......marinated in brine for 12 hours and then baked the traditional way. Both methods result in such a moist turkey.


Thanksgiving is my favorite holiday, especially when it is spent with those you love ♥


post signature