Showing posts with label finished projects. Show all posts

Dec 14, 2012

Doll Quilt

I made a doll quilt to go with the doll bassinet and the dolly diaper bag that I made for my 2 l/2 year old grand daughter Maisie.
I wanted to keep it simple, so I sewed 9 charm pack squares together.  I quilted it with swirly swirls :)  It's a good way to practice my machine quilting.


Whenever I bind a quilt, I put the leftover binding in a box.  
I use the leftover binding for doll quilts or for a scrappy binding.
There are four different fabrics used in this leftover binding.
I just attach whatever binding fabrics I think look nice together.


Do you see the four different prints in the binding?
I think it adds interest to the quilt.


I hand sewed the binding to the back of the quilt.
I made a little pillow that fits into the doll bassinet perfectly!
I just cut two pieces of fabric, sewed around the edges making sure to leave an opening.  I stuffed the pillow with fiber fill and sewed the opening closed on the sewing machine.  Very easy!


I don't have the doll to show you how he looks in the bassinet.
I used a porcelain doll, but she's a little long.


You get the idea....
I would have loved a gift like this when I was little!
I wish I could watch Maisie open her gifts on Christmas morning.
I would love to see her reaction :)


post signature

Sep 19, 2012

Laptop Cover

A couple of years ago, I made a laptop cover for my daughter who loves owls!  
I liked the little owls that I machine appliqued so well that I added a little padded one that dangles, sort of like a bookmark.
The owls have button eyes backed with white and black felt, and their wings are soft brown minky fabric.


This is the back of the laptop cover, with the flap open. The flap has a long velcro closure.  I padded the cover with cotton quilt batting.  It was a really simple project.
If you make a laptop or ipad cover, just make sure to add 1" all the way around so that the laptop or ipad can slide in and out of the cover easily :)


post signature

Sep 12, 2012

Dots on Dots Blog Hop and Tutorial


Hi everyone, I am participating in the "Dots on Dots Blog Hop", sponsored by Quilt Taffy.  
The challenge was to make a 12" block, but you had to use one or more polka dot fabrics. 
I went to my fabric stash and learned something about myself, I love polka dots!!!
 I wanted to try something new, so I went to Pinterest and looked at my Quilt Blocks board.
I really liked the Rocky Road to Kansas quilt block.
It is paper pieced, and I have never tried that technique before.
There was a great tutorial by Fresh Lemon Quilts.
Here is the photo tutorial of my block.

I printed the template from Fresh Lemon Quilts, very easy!
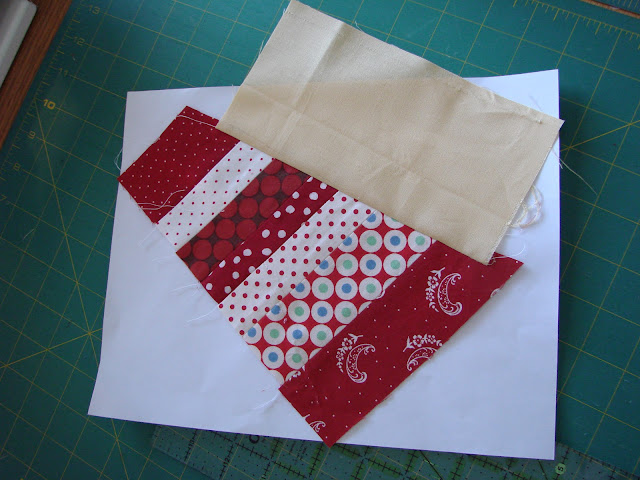
I wanted a scrappy star, so I cut all my polka dots strips to sew together.


I arranged the polka dot fabrics strips in the order I liked them best.


Then I sewed each stack together.


You set your stitch length to a low number so that the stitches are really small, and the paper will rip away from the stitches really easily.  You just sew along the line on the pattern.


This is what it looks like on the back.


The yellow fabric is pressed back, all while keeping the paper pattern intact.


The paper pattern is meant to put on a light box so that you can place the fabric with a l/4" seam allowance.


You sew the fabric pieces on in order, starting with attaching 2 to 1 and 3 to 1, and so on.


This is sewing piece number 3 to piece number 1, while watching the tutorial on my ipad.


After the piece is sewn on, you trim the seam allowance to l/4".


Finally, piece number 4 is sewn onto piece number 1.


All the pieces are sewn together and pressed, now it is time to trim.


Trimming is so easy, you just cut along the outside lines.


It is so easy!  The inner line is the sewing line.


My square is complete, just need to make 3 more.  For each square, you will need a paper pattern.


Since the square is complete, it is time to rip off the paper pattern.


I am thrilled, my square looks perfect!


Here is my unfinished 12 l/2" square.  
Paper piecing was fun, I am going to make some more projects using this method!


I added a l l/2" border to my square.


I tried "pebble" quilting, and it looks like polka dots!


Since this block was so little, it was perfect to try a new quilting design.


A scrappy Road to Kansas Star looks great with a scrappy binding.


It's all finished, do you like it?  It is a 14" decoration for my tabletop.


Even the back is dotty :)


These are the rest of the blogs who are on the blog hop today.
Thanks for visiting mine, now if you want to be dotty, take a look at all the others.

September 12th


If you want to visit all of the blogs on their respective days, just click on my dots to dots button on the right of my blog.

Aug 29, 2012

Wall Hangings


I made these quilt wall hangings about two years ago.
The pattern is "Two Peas in a Pod" by Sweet Shoppe.

I made this one for my grand daughter Maisie.


Rebecca chose the fabric for this quilt. I was with her at Material Girls, she kept loading up her husband's arms with bolts of fabric!   I love the aquas and pinks with touches of orange. 
 The flower stems are made of rick rack.
I put Roxanne's glue baste glue under the rick rack and make sure it is positioned correctly.  Then I stitched each rick and each rack (lol!) with a needle and thread to secure it.
I appliqued the flowers with fusible web and a little machine blanket stitch.  It worked really well!  Do you notice the scallop border on the top?  I did needle turn that by hand.  


I love pinwheels!


This is the wall hanging I made for my grand daughter Neo.
I had a lot of fun choosing the colors myself.  I wanted it to look "sunshiny"!


Lots of yellow, orange and pink with touches of aqua.
I kept imagining Neo lying in her crib, looking at the quilt while she was waiting for her Mom or Dad to get her up.  What would she be thinking while she looked at the quilt........what colors would inspire her......what colors would make her happy?  It's funny what you think while you sew.....


I backed the quilt with my favorite....."Sew Cherry".


Did you notice that I snuck in some pink and aqua rick rack for the flower stems?  My favorite way of attaching a quilt to the quilt rod, is to gently safety pin some ribbon to the back of the quilt.  I tie the ribbon in pretty bows and the quilt is hung.  It is really easy to just remove the safety pins and you can put the quilt on a table, behind the couch or on a bed.


This is a quilt I could make over and over again.
My friend Cindy Paulson, machine quilted both quilts.  She always does a fabulous job!  

post signature

Aug 22, 2012

Domestic Diva, quilted!

I wrote about this table runner back in May, here.
It took me 3 months to get around to quilting and binding it.

I quilted in the ditch, and it gave the quilt a "puffy" look.


I think I prefer the look of an all over stipple design.


I just love this Riley Blake "domestic diva" fabric!


Here is the finished table runner.  I wish I had used the red and white polka dots for the binding.  It would have made the divas "pop" more.  I still like it and can hardly wait to get it on my table :)


It's always a great feeling to get a project finished.

post signature