Jul 27, 2012

Great Granny

Hello everyone! 
 My friend Lori, is having a "Great Granny Along" on her blog,
 Bee in my Bonnet. 
 You can find part 1 here.
I had a great time making the squares, they are very addictive. 
 You just love how one block turns out and can hardly wait to get started on another!
It has also been fun looking at everyone else's blocks on flickr and on other's blogs.
Lori made 9 blocks which created a table topper.  That is exactly what I wanted to do.  I am going to machine quilt it myself and I can only manage table toppers, table runners and baby quilts.
I decided to make each of the 9 blocks a different color.
I was able to use my scraps, which to me means anything smaller than a fat quarter.
The first thing I did was cut all 25 - 2 l/2" squares.


I turned all the squares so they were on point.
I sewed the 3 squares together on a row, then the 5, then the 7, etc.


After I had sewed the blue squares in rows, I added a white rectangle to the end of each row, excluding the middle row.
I sewed the rows together to make a block, and then sewed four longer rectangles on each end, centering them.  
The block's edges now look like stairsteps.


Each block will be cut to 12 l/2", so I simply center my 12 l/2" square ruler over the block.


With my rotary cutter, I trim off all four sides, even with the ruler.


I did mine a little differently.  I chose a colorful center, and surrounded it by the same fabric print.  All the other squares in the block are different, giving my great granny a scrappy look.


I love this aqua block, the colors are so soft.  Almost every square of fabric brings back a memory.  An outfit I made for a grand daughter, a quilt, doll's dress, bag, etc.


I love the elephant that I fussy cut in the center of this pink block.


I thought the gray block was really different.  I was thrilled to have little red riding hood fussy cut for two of the squares, including the big bad wolf and a pretty tree that is in the fabric line "A Walk in the Woods".  I also love the grey houses and flowers from "Daisy Cottage" by Lori Holt who is hosting the "Great Granny Along".


I had a harder time finding enough oranges, so I had to use some 30's prints.  I really like the butterfly in the middle.


I love the red, and like the apples I was able to find in my stash.


Can you see a little baby's head in one of the squares?
I am making a baby quilt with that fabric.


The little car and elf are pieces of some Japanese fabric that I have.
Can you tell that I am reminiscing about all the fabrics I used?  lol


It was really hard to find enough purple pieces.  I had to dig into my 30's prints and civil war reproduction fabrics.


All 9 of my blocks are sewn.  I really love the fact that each one has their own color scheme, it's very colorful.  I think I was inspired my the mini granny that I made here.


On Monday, I will show you the finished table topper, sashing, quilting, binding and all :)

post signature

Jul 25, 2012

Mini Quilt Shop Hop Adventure

I had a lot of fun on my mini quilt shop hop!
I left the house at 10:00 a.m. and returned home at 3:15 p.m., and drove 81 miles.
I decided to buy something at each store, making it a bit of a scavenger hunt :)
My first stop was Beverly's in Citrus Heights, about a 15 mile drive from home. Beverly's is a craft store with a large quilting section.  It is a chain store, so I wasn't shy taking photos.


They had lots of Vintage Modern, there were other colors too.


Look at all the bolts of quilting fabric.  They had a lot of it arranged by color.  Pinks, oranges, and on the end aisle next to the orange, are Dr. Seuss prints.


Dr. Seuss minki....


......and lots more minki!


I really liked this owl and woodland section.


Nothing but dots and stripes.


They had a pretty good selection of Amy Butler fabrics.


I spent a lot of time at Beverly's.  We have one in Rocklin too, but not quite as much selection as this one.
My purchase was a Clover l/2" bias tape maker.  If I fold the bias tape in half, it would also be l/4" double fold bias tape. 


My next stop was Thistle Dew Quilt Shoppe in Fair Oaks, about a 5 mile drive.  Fair Oaks is a teeny little town surrounded by lots of other towns, so it isn't in the country.  There are only about 3 blocks of shops, vintage stores, a ribbon shop, a candy store, a couple of antique stores, and two or three little cafes.  There is a park that takes a block and has all sorts of chickens roaming around.  There are many different types and colors of chickens, they all look exotic.  Last December, Mabulane (my daughter in law) and her daughter (my grandaughter) Neo went to the park.  When Mabulane got out of the car and walked on the grass, all the chickens came running towards her.  It startled her, but they left her alone.  It was funny!  
Neo is quite nervous around animals, so she had to be held and had a very worried look on her face :)  This is a photo from December.


Here is a photo of the Thistle Dew Quilt Shoppe.


This shop had some cute fabric.


I bought a Clover brand awl, and fabric with scissors :)


The next stop was Quilter's Corner in Sacramento, another 8 mile drive.  See my cute little convertible?  I drove with the top down the whole time but every time I stopped I put the roof up so that the car wouldn't be burning hot.  It was in the low 80's when I left home, but the temps quickly rose to the high 90's.


This store had a lots of fabric, and they specialized in carrying the largest selection of civil war reproduction fabric in Northern California.  I have a box full and don't really need any more.


I really like this self of Lakehouse Pam Kitty Morning fabrics.


I was really excited to see these John James embroidery needles.  I have been looking for some for a long time.  I also bought some straw needles for applique and 2 yards of Amy Butler fabric (half price) to back my great granny quilt (I will show you pictures soon).


My last stop was the Country Sewing Center, a 21 mile drive to Elk Grove.  I had no idea where I was going, I just set the navigator on my phone and drove.


This was my favorite shop, the fabric selection wasn't any better than the others but I liked the layout of the store.  


I bought a yard of the blue Amy Butler fabric.  I love that print.  I have it in pink and just had to have some in blue.  I bought two pieces of "sewing" fabric and some Aurifil thread.  The saleslady said, "Oh, you're an Aurifil girl".  I guess I am!


The saleslady was so friendly and very knowledgeable.  I asked her if there was a way to get back to Rocklin without going on the highway.  She drew me a little map and I got to enjoy country roads for a while.
I drove by a huge vineyard that went on for about a mile.  I just stuck my arm out of the car and took the picture!  lol


This is a really pretty entranceway to a house, or a mansion!


I had a great day, and am glad I was able to share it with you.


post signature

Jul 23, 2012

Baby Brit quilt along reminder


I want to remind you of my "quilt along", called "Baby Brit".


The link to the info is here
 It begins August 6.
I devoted one of my boards on Pinterest, to Baby Brit.

Technically, Baby Brit is just six blocks in a quilt, but I just liked the different color variations.

I will let you in on a little secret......
I have already made the first block....shhhh.....

I had to get it done so I could write the tutorial and post it on August 6.

I had no idea it would be so much fun to sew!
It is a slightly different method than I have used before, but it was really easy. 
Easy, wheezy, cheesy, breazy!!!

Please join us, my daughters and I.

I am going on a little adventure today, on a mini quilt shop hop in my new convertible.
The roof will be open, and the sun will shine on my face.   
I will tell you all about it on Wednesday.


post signature

Jul 20, 2012

Binding Tutorial, Part 2

I hope you read my binding tutorial, part 1.  It can be found here.
After I have attached the binding to the front of the quilt, I hand sew it on the back.
There are a few tools of the trade that I always use for this.
Scissors, quilting thread, needle and pins.


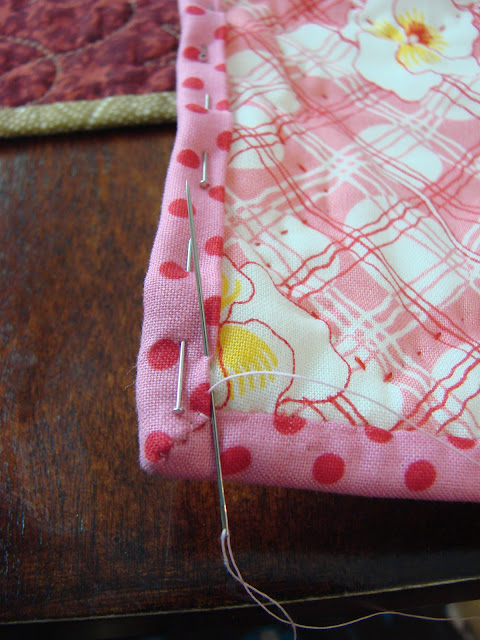
I pin the binding on the back, so that the binding hugs the quilt, and the machine stitching is hidden.


I thread my needle with a single thread and knot the end. Then I use a blind stitch. Take a small bite out of the fabric on top (binding).....


.......and take a few fabric threads from the quilt (pink fabric), directly below where you took a stitch in the binding.  Then take another stitch in the binding, about a centimeter or 1/4" away from your previous stitch.  


Now we're coming close to the corner.


Pin around the corner, the miter takes its shape naturally because of the method it was sewn in part 1.  Help it along by pinning.


I take little stitches along the miter seam in the corner, going down and then coming back up again.


Continue on your merry little way, stitching until you're finished.


Now turn the quilt over and admire your handiwork.


This is my favorite method of attaching binding.  The corners look perfect every time.


Pretty on the back too.


I hope you have enjoyed the tutorial, and even found it helpful.


I always look forward to binding my quilts.  I can grab my tools, stretch out my legs and hand sew while I watch or listen to the TV. 


My little quilt is colorful, do you think it looks good on the chair?


My cute little "grandmother" looks nice on the mini quilt. My mother sculpted her.  She has a faraway, pensive look in her eyes.  She has lived a rich life and when she sits down to sew all of the many warm memories of children and grandchildren and friends flow through her mind as she thinks and quilts.
She looks kind of sad though, maybe all she has left to keep her company are her memories and her quilts.....


post signature