Apr 20, 2012

Constructing Maisie's Easter dress

I want to walk you through what it takes to construct a dress.
First, cut out all the pieces.


I wanted to add piping trim, so I stitched it on with a basting stitch. Piping was added to the two collars and front yoke and back bodice.  The back bodice will be folded in half, creating a lining.  The piping is only added to half of the bodice.  


I sewed the collar facing to the collar and turned them right side out.  I used the basting stitch as a guide for the stitching line so that the piping would show.


This way of lining the yoke and bodice is a little confusing at first, but the results are great.  You attach the pieces at the shoulder until it looks like a circle.


The two collar pieces are attached to the front yoke.


Fold the circle in half and stitch. Clip the seam allowance around the curves.  Notice the straight pins?  They are  wonderful!  I can sew over them time and time again, and my machine needle doesn't break, the fabric doesn't snag or pucker.  They are made by Clover, extra fine glass head pins.  You can also iron over them.


Turn the fabric right side out and you have a perfectly enclosed collar.


The back skirt is a rectangle.  You find the middle and cut a 3" slit and attach the placket.


I made the sashes, rectangles folded in half and stitched, making a pointed end.


Gather the skirt back and attach to the back bodice.


Wrap the bodice lining around the bodice and skirt and stitch.  Turn it right side out and your back bodice is completely lined.


Sew the skirt front to the front yoke.


To be continued in the next post.

post signature

Apr 19, 2012

English Smocking

This is me, concentrating really hard.  It takes focus to smock because you are constantly counting the pleats...2 up, 3 across, 2 down, 3 across, etc.


When you smock, your needle is always kept horizontal when you take stitches into the pleats.


This is what the smocking pattern looks like.  The thread I like to use is called floche.  It is made my DMC, but instead of 6 strands of floss, you only use 1 strand. Floche thread is cotton, and it is very silky.  I think it lies really well on the pleats.


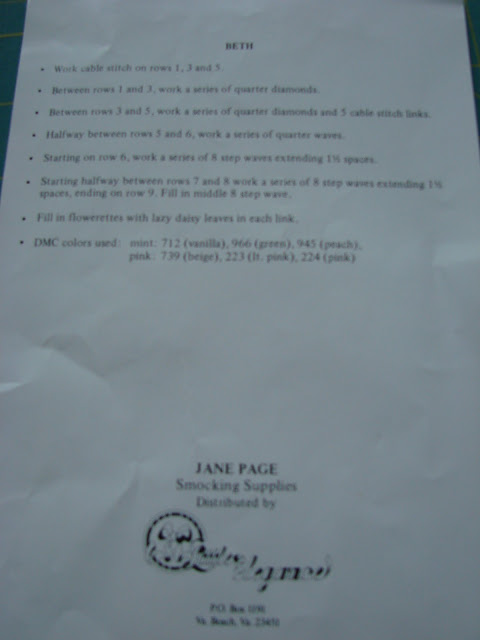
This is the back of the pattern, the instructions.  It doesn't give you very much information, just some mathematical directions.


The pleating threads are used as guides for the different rows.  I am worried that the pleats aren't going to stay together in the middle of the hearts, so I am going to have to do a row of backstitching.


On the back of the smocking, I did one row of cable stitch.  That will hold the pleats together on the front.


The smocking is complete.  This dress is size 3, a smaller size and I smocked next to the armhole on the dress front.  There are blue lines drawn for the lower half of the armhole which I will cut after I have blocked the smocking.  To block, I lay the front of the dress on the ironing board and match it to the size of the blocking guide. Then I pin the dress to the ironing board using a few straight pins.  I spray the smocked area with some mild starch and spray steam the smocking.  Let it dry.  


Now it's time to construct the dress. 
Look for that tomorrow : )
post signature


Apr 16, 2012

Pleating fabric in preparation for smocking


Chery Williams - Basic Square Yoke Dress

This is the first of a four part series.
I  made my grandaughter Maisie, a smocked Easter dress.


I used Chery Williams "Basic Square Yoke Dress" pattern.


The pattern comes on a huge sheet of paper, and is printed on both sides of the paper.
I use freezer paper to trace the patterns and cut them out.  I don't use the waxy side, but the paper is big enough to trace the large pieces.


I always trace the patterns with pencil, making sure to write the size, how many pieces to be cut and where the grain of the fabric is.


In order to do the English Smocking, the fabric has to be pleated on a special pleater.  You determine how many rows of smocking the dress will have according to the size of the dress, and add an extra row on top and bottom.  Carefully roll the fabric onto a dowel that can pass through the holes of the pleater.


When pleating fabric in preparation for smocking, it is extremely important to use quilting thread.  Regular thread would be weak and break and it takes way too much time and effort for that to happen!  Use strong quilting thread.  My husband made me this board that holds the pleater with velcro and has posts to hold the spools of thread.  Some  have broken during our many moves but there are still enough to make it work.  I am smocking 8 rows, so I need 10 rows of pleats.


The needles for the pleater fit under the rods, and they are squiggly in shape.
Dr. Joe Pleater Needles
When you run the fabric through the pleater, make sure the top of the fabric is even with the notches above the notch of the top needle. This notch is used as a guide while gently running the fabric through the pleater.  It is very important to be gentle so that a pleater needle doesn't break.  If it does, you have to take everything apart and start over.  It is painstaking just to thread all of those needles!!!


The fabric pulls out straight at the beginning.


The more the fabric is pulled through the pleater, the more it pleats up.


I finished pleating the front of the dress.  It is quite a painstaking task but luckily it pleated on the grain and none of the needles broke.


Tomorrow I will show you how I smock the pleats.
post signature

Apr 13, 2012

Row Quilt


This is the last in the three part series of block of the month classes that I took at Quilts Etc. I took this class with my daughter, Lindsay.
Each month we received enough fabric to make four 6" quilt blocks.
I wanted my quilt to be big, so every month I made 4 extra 6" blocks with fabric from my stash.


These country colors used to be my favorite for quilts until all the bright colors came on the market.  


The houses were a lot of fun to make, and I enjoyed making the tree blocks and adding them here and there, not symmetrical.  


Notice the sashing?  Horizontally there are 1" squares, and vertically there is 1 l/2" navy blue sashing. Do you remember that I said I like dark sashing because it makes the blocks "pop"?  I added the red border to accentuate the reds in the quilt.


I backed the quilt with a Thimbleberries print.  Notice how beautiful the quilting is!
I didn't have the opportunity to take another block of the month class at Quilts Etc.  because I moved to another state.  My daughter Rebecca took one of the classes a couple of years later, I would have loved to have shared that with her.
post signature

Apr 12, 2012

Think Outside the Box


This quilt was made at Quilt's Etc., another block of the month class.  I took this class with my daughter Lindsay.
The name of the Quilt class was "Think Outside of the Box."  The reason for this name was because the blocks were different sizes.  There were a lot of 6" blocks, some 12" blocks, some 8" blocks and even some rectangle blocks.  You definately had to get creative, figuring how to put the quilt together!


There were a few different color choices for the blocks.  I chose "It's a Guy Thing".  My kits had masculine colors for the quilt blocks. 
To make the blocks fit in the quilt, I had to make some extra blocks like the block in the lower left with the flying geese and pinwheel. I also added a lot of flying geese here and there to make the blocks fit.
I didn't like a lot of the colors that were in the kit but I used them anyway.  That was part of the challenge....I think it looks really good, even the ugly fabrics.  I try to use some fabric I'm not very crazy about in scrappy quilts because somehow they seem to make the pretty prints look even better!


I put star blocks in the corners because stars (and pinwheels) are my favorite quilt blocks.
I designed the quilt to have finished l  l/2" squares around each quilt block.  I really like dark sashing because I think it makes the blocks "pop".  I couldn't get any darker than black, but I think it makes a statement.  I laid all the blocks on the floor and then designed the quilt mathematically on graph paper.  


I found this very masculine fabric and couldn't decide which color of the print that I liked the best, so I bought some in all four colors and sewed a patchwork back.


I made this large lap quilt for my husband for Christmas in 2006.  I embroidered a poem that I composed, on a square on the back of the quilt.

As I cut out the fabric
for this quilt,
Every piece reminds me
of the family we've built.

My husband really liked it!  He uses it almost every evening when he watches TV.  I hope you have enjoyed this quilt's story :)


post signature

Apr 11, 2012

Underground Railroad

I took a block of the month class at a quilt shop called Quilts Etc.
We made blocks from the Underground Railroad quilt.  


Secret messages in the form of quilt patterns aided slaves escaping the bonds of captivity in the southern states before and during the American Civil War.
Slaves could not read or write, it was illegal to teach a slave to do so.  Codes, therefore, were part and parcel of the slaves' existence and their route to freedom, which eventually became known as the Underground Railroad.


This was a really fun block of the month class.  The first month you bought your kit for $5 plus tax.  If you came to class the next month with your block completed, you would get that month's kit free.  Otherwise, you would buy the block and pattern and fabric for $5.  The class lasted a year.  It wasn't a sewing class, but an informative class.  The instructor would give some history and explanation about each block and visually demonstrate how the block went together.
Towards the end of the 12 months, you had to decide how you wanted your blocks to go together in your quilt.  That was the fun part, designing your quilt!  It was so much fun every month because    everyone (about 30 or more) would share the projects they had finished.  I better not forget to tell you that it is so much better to go to this class with a friend.  I loved sharing the class with Nanette, my friend who taught me how to quilt
Here is my completed Underground Railroad quilt:


The fabric for the blocks was provided in the kit, but the sashing and extra fabric to put the quilt together would need to be purchased.  Each finished block is 12".


Block names are (top left) Bear Paw, (top right) Safe Passage, 
(bottom left) Crossroads, (bottom right) Guiding Light or North Star.


(top right) Bow Tie or Broken Dishes  (bottom right) Log Cabin.
If the center of the Log Cabin block is yellow, that means there is a light in the window, it is a safe home, warmth, someone is waiting for you.
If the center of the Log Cabin is black, that means it is a safe home in the Underground Railroad code.
If the center of the Log Cabin is red, that means it is the hearth or heart of the home.


(top left) Carpenter's Wheel, (top right) Flying Geese, 
(bottom left) Basket, (bottom right) Wagon Wheel.


(top left) Shoofly, (bottom left) Monkey Wrench.


I put two extra blocks in the corners because there wasn't enough room in the quilt.  The name of this block is Birds in the Air.


The name of this block is Drunkard's Path.


Here is the quilt label that I bought at the quilt shop.  It tells the story of the Underground Railroad.  
All of the fabric used in the quilt is Civil War reproduction.
I hope you have enjoyed my journey of this quilt as much as I enjoyed sharing it with you!


post signature