Apr 27, 2018

Cubes Quilt quilt along

I made this Cubes quilt for the Fat Quarter Shop's quilt along.
This is the quilt top, I still have to machine quilt it :)
I love how it turned out!


I chose Tula Pink's All Star line of fabric.
All Stars is the favorite fabric prints from her Spirit Animal line.
Look at this cute squirrel!


A beautiful owl.


I really love this raccoon.


I never thought flies were pretty, but this one is!


The cutting instructions were very easy for this quilt.
The pattern calls for 18 fat quarters and 2 yards for the background.


This is the layout of one of the blocks, there are 12 of them.


The backing fabric that I chose is by Lila Tueller, and I think it's a perfect match!


I enjoyed machine quilting this quilt, I made swirls on the blocks and feathers in the sashing.


I love this little white church backdrop!


Here's a closeup of my machine quilting.


Here's a photo of the back of my quilt, but it's upside down.
Ooops!
I really enjoyed making this Cubes quilt.
It went together pretty quickly, 
considering it's made of cubes and rectangles.


Thanks Fat Quarter Shop for the opportunity to be in your Cubes quilt quilt along :)

Apr 23, 2018

The Greatest Showman!

This post isn't about sewing or quilting.
We have been busy planning youth conference for months.
Youth Conference is for youth ages 14-18. 
We play some games, do service projects, take faith promoting classes, watch or participate in a talent show, have a dance and end with a testimony meeting.
It runs from Friday night, all day Saturday and Sunday evening.
As an opener to the talent show, the leaders did a short dance and lip sync to "The Greatest Showman"!
I was the bearded lady, lol!
If you ever want to wear a beard, buy some "spirit gum" on Amazon and cut hair from a wig in little pieces and adhere to your chin.
It feels pretty comfortable and is easy to remove.
I pulled the hairs off in sections and removed a little bit of glue residue from my face with rubbing alcohol.
Easy peasy!


I don't know if you've seen the movie, but it's amazing!


Here's a selfie of the amazing ladies whom I work with :)


Here's the team we danced and performed together and put in so many hours planning uplifting activities for our youth!


Apr 16, 2018

Tee shirt quilt

I'm making a tee shirt quilt for a young man who's graduating from High School in May.
His Mom has been collecting his shirts since 
he was about 5 or 6 years old.
It would be really easy to cut all the logos out the same size, maybe 12" square.
The reality is that not all the logos are the same size!
When I made a tee shirt for my son about 4 years ago, it was completely custom and I thought it was so pretty.
A lot of work but worth it.
You can see his here and here :)


The secret to making a tee shirt quilt is to use an iron on 
"woven" stabilizer.
The stabilizer keeps those slippery fabrics (sports jerseys) and stretchy knits in place, as if they are quilting fabrics.
I cut out the logos, iron on the stabilizer, and then trim them with my rotary cutter to the size that looks the best, or fits the best.
Another secret, is to use a cloth when ironing the tee shirt logos at ALL TIMES!
I smeared the tip of the "y" on the Blue Jays a little 
because I forgot....
You can see it when the quilt blocks are laid out below.


The "Simms" block was a strip of fabric that was embroidered and then sewed to the jersey.  
I just cut off the embroidered section, that's what I mean when I say that I'm at the mercy of the logos, lol!
There is no way I could have cut this into a 12" square!


The blocks have all been trimmed, 
and I recorded the size of each block.


I laid the blocks out, mostly in chronological order.
I quilted the young man's name, 
using Lori Holt's Spelling Bee book.
I used red because it balances out the other two blocks.
(I received a few more shirts after I had the quilt puzzle calculated)
Garrett loves the NY giants (red and blue) and blue was the color of both of the high schools that he went to.
I used gray for the background of his name to make it look more like a jersey, but it looks a little brown :(


This architectural rendering took me hours!!!
I fit all the logos, added sashing, and I had to do it in a manner that I was still able to sew.  
For instance, the blocks had to be graphed into larger blocks.
I did this before I received the extra shitts, 
that's why it's good have an eraser close by :)


I had to cut the tee shirt at an angle because that's where the seam was.
I sewed some red Kona along the seam, pressed it away from the seam, trimmed it and it will never be noticeable :)


 Here's my redesigned architectural rendering, most of the adjustments were made at the top of the pattern.


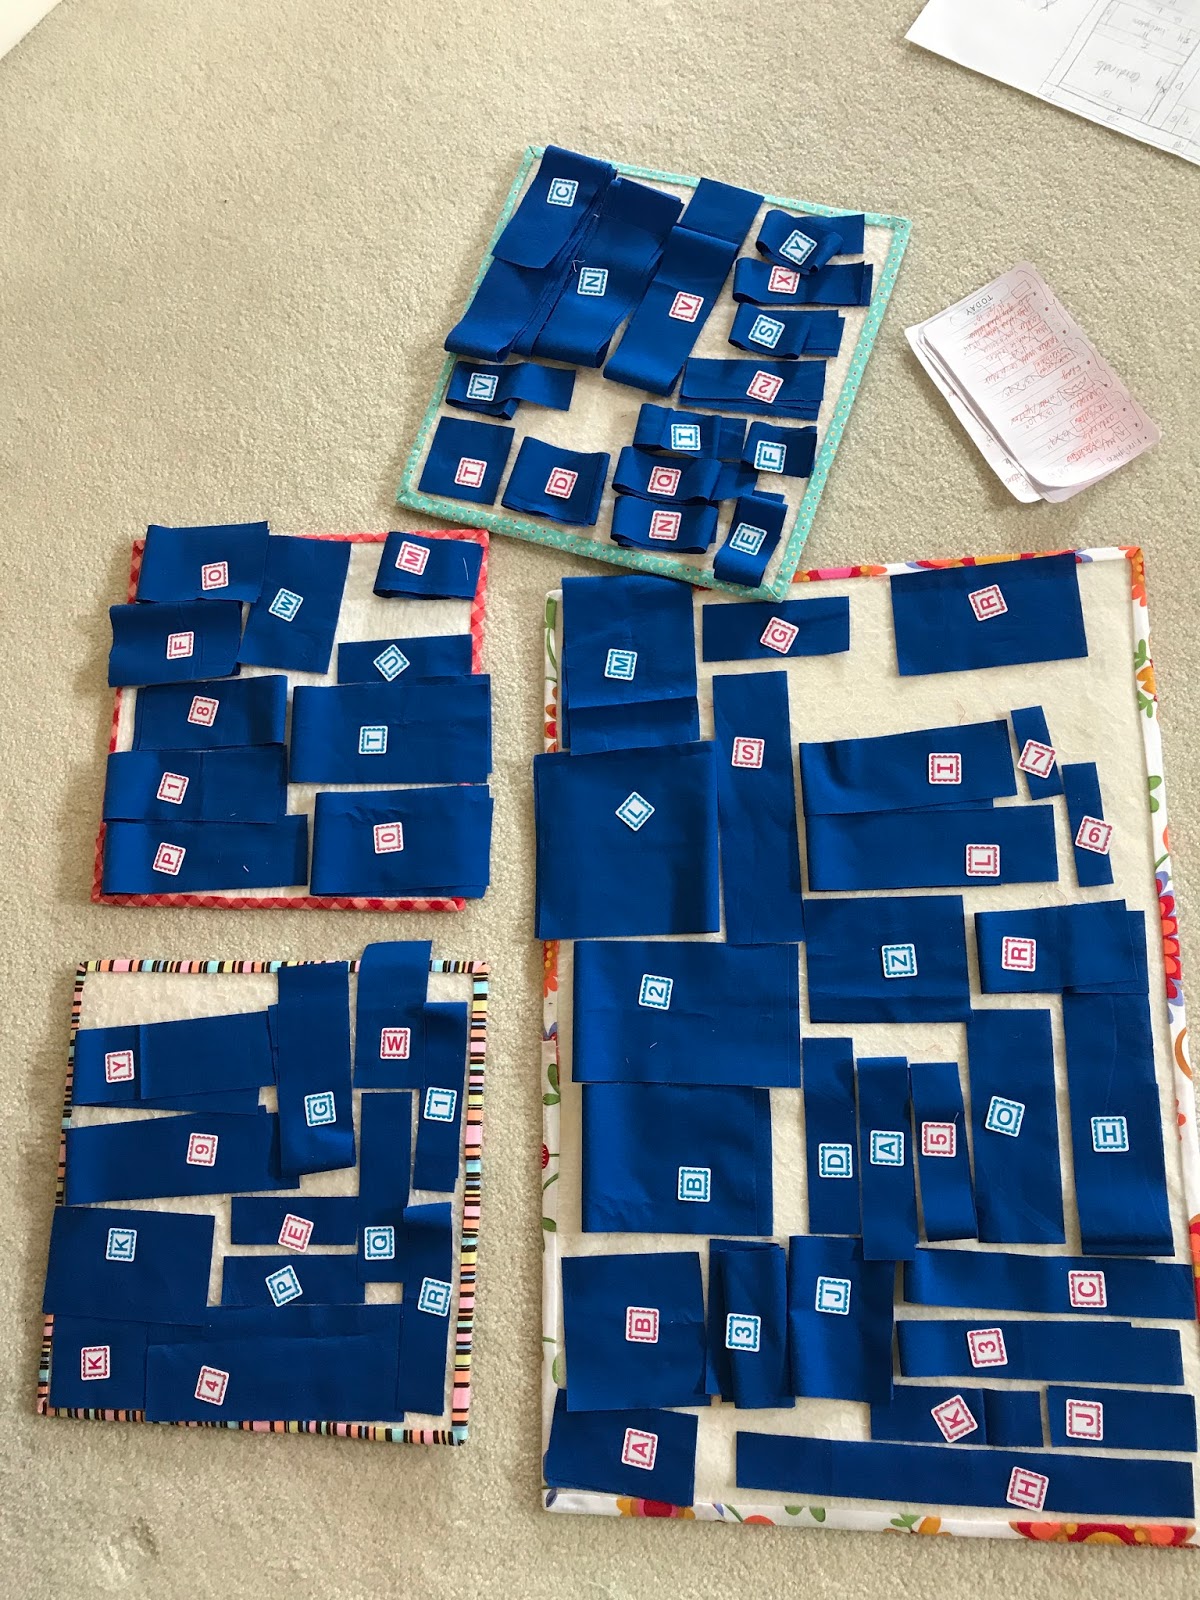
Here are all the sashing pieces, I used 2 packs of Alpha Bitties.


The numbers are circled and I used double letters for the blue Alpha Bitties.
I crossed off the sashing pieces as I used them.


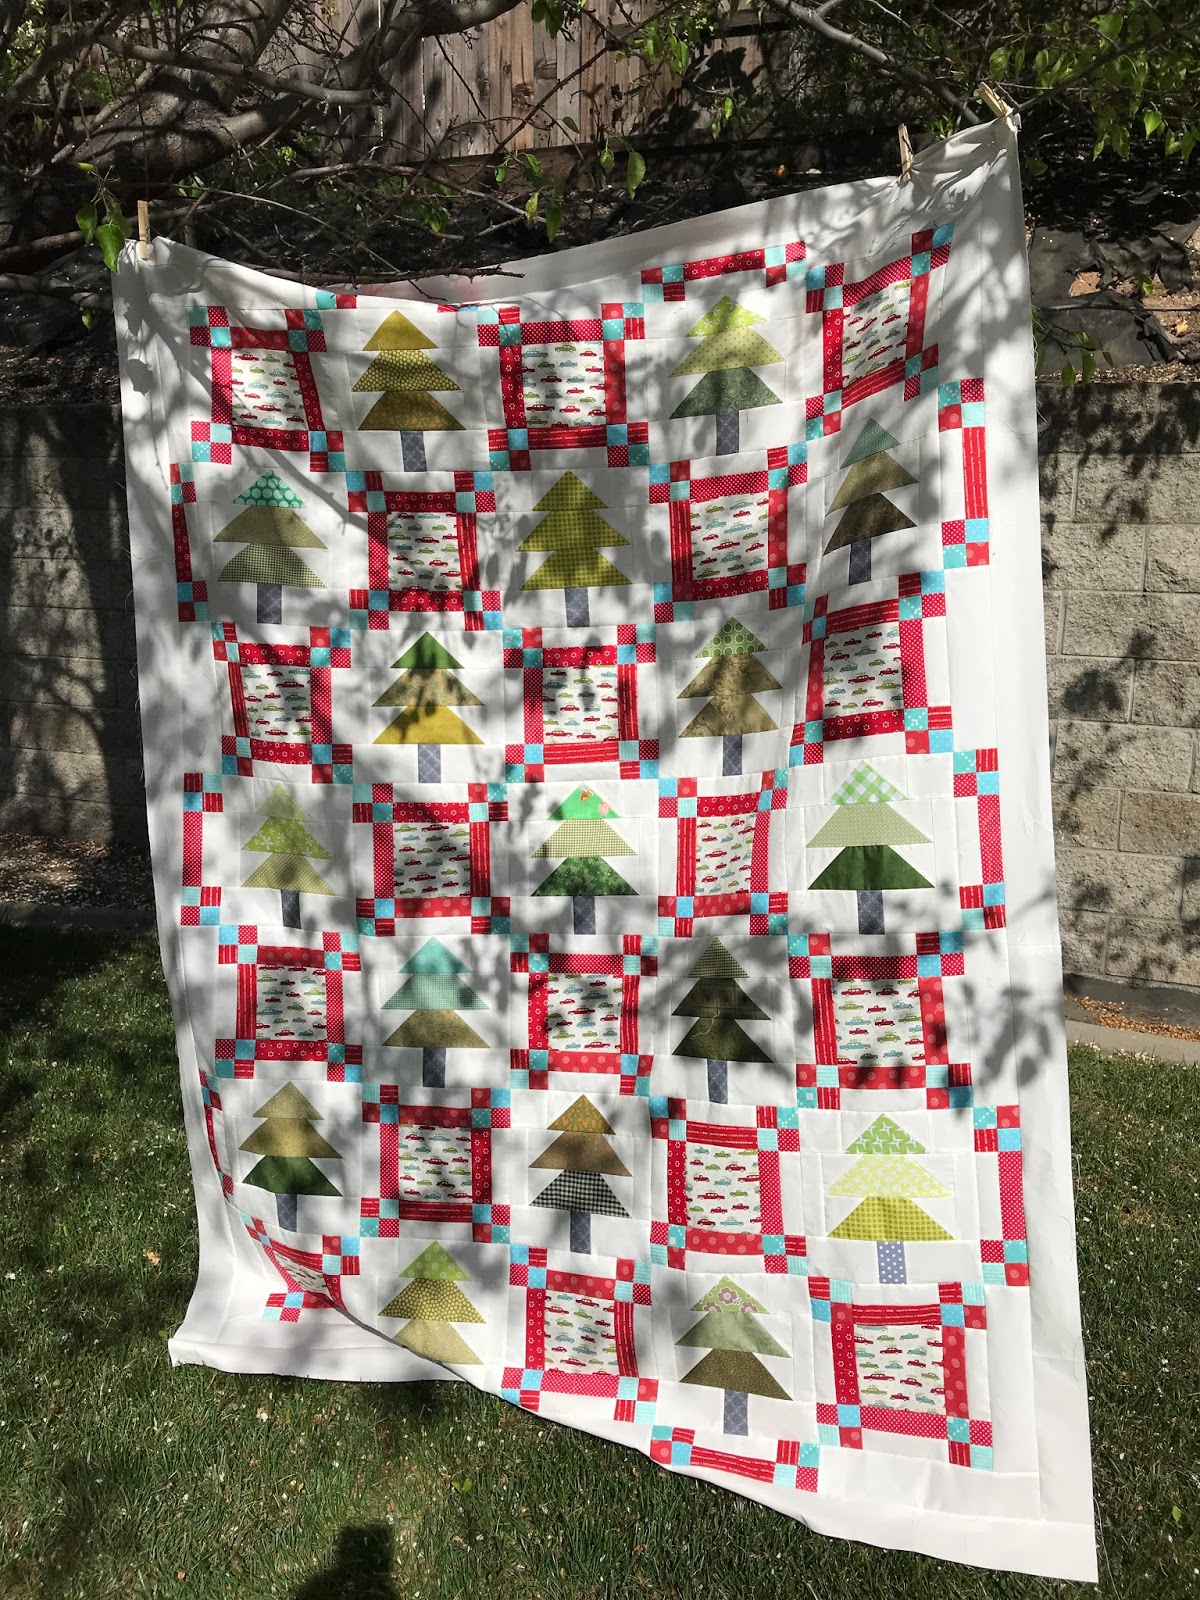
 Here is the quilt top all finished!
I added a 2 1/2" border to give it a NY Giants color theme.
I used white sashing on my son's quilt, but noticed that it got dirty very easily.
I like the "rich" look of the blue sashing, and there are quite a few white blocks that wouldn't have shown up very well if I had used white.
A few interesting things to note about the tee shirts.
Garrett is the young man's name, Simms is his middle name and Ruslin is his last name, all on the quilt :)
The reason I put his name at the bottom of the quilt is because I pictured the quilt laying on his bed in his college dorm.
When he walks into the room, he will immediately see his name and remember how much his mom loves him because she lovingly had this quilt made for him :)


I'll show you the quilt again when it's machine quilted.
That will be a challenge because the quilt top is heavier than normal because of the weight of the tee shirts!

Apr 9, 2018

Fresh Cut Pines quilt

I have lots of friends on Instagram, it's really nice to connect with other women who have the same interests :)
One particular group of quilting friends, all loved the quilt pattern Fresh Cut Pines, by Sherri Falls, it's in her book!
We all bought the fabric for the quilt and were going to make them independantly of each other.
Mainly because we live in Australia, California, Utah, Wyoming, Idaho, Chile and Oklahoma :)
I'm going to think of my dear friends every time I see this quilt!


I thought I would dip into my stash when I made this quilt.
So many four patch units!
99 to be exact :)


I didn't take a closeup photo, but in every square, is some cute fabric with vintage looking trucks carrying a pine tree in the cargo bed.
I bought that fabric and the background, everything else I used from my stash.


When I finished my quilt top, I ran downstairs and went into the backyard to take a photo.
I didn't realize it at the time, but all the photos were blotchy from the warm sunshine!


 I waited until my husband came home so he could hold up the quilt for a better photo when the sun was lower in the sky.
I began this quilt in January, and just worked on it between projects, when I had some extra time.
It wasn't difficult to make and now I've got a pretty new quilt!


Mar 26, 2018

Bubblegum Kisses, finished

I promised that I would show you my finished Bubblegum Kisses Mini quilt that I received in my Sew Sampler Box from Fat Quarter shop.
You can see my post about it here.
I quilted it in a circle motif, echoing the original circle with my walking foot, and using the foot as a spacing guide.


I backed the mini with a Lori Holt print, of course!


 I'm displaying the mini quilt on my half wall right now, looking into the living room.


Thanks for following me :)

Mar 19, 2018

Quilty Fun Birthday Cake banner

My youngest grandson is Jacob, he will be 2 years old on April 8, and this quilty fun birthday cake banner is for him!
Then I'll be all caught up with my banners :)


I wasn't able to use my "M" and "N" pieces, because I cut them a l/2" shorter than they should have been!
I like the look of this cake though.


I used Lori Holt's fabric with dessert recipes, for the border.


I quilted with a stipple stitch, but tried something different with the cake and cake stand and bow.
In the past, I have used my walking foot and outlined the pieces, using stitch in the ditch method.
This time, I used my free motion foot and just traced around the pieces.
I think I prefer the look using the walking foot.


I pieced the back, using a cute fairy tale fabric.
Unfortunately, I don't remember the name of it!


I outlined each letter with the free motion foot too.
I'm not crazy that some of the stitching runs into the letters.
I used a machine blanket stitch to attach the letters.
I have a tutorial with measurements for the banner that you can view here.


Thanks for reading my posts!

Mar 12, 2018

Retro Mama's Notions Pouch

I think that Kim from Retro Mama designs the cutest things!
The moment I saw her little notions pouches, I was in love.


I bought her pattern and set to work, even though I had so many other things I should be doing!
I'm a sucker for cute things, including grandchildren :)


It's a funny thing, but when I use my scraps, the piles never get any smaller!
Weird!!!
Notice all the delectable little strips of prettiness?
I cannot lie, I love fabric!


 I adore my little pouch!
I don't know what I'll use it for or who I'll gift it to, but I love it!


Here's another one, the possibilities of each little pouch are endless!


I bought the metal zippers just for this project.
Zipits is a great shop to purchase zippers, on Etsy.


Here's the inside of the pouch.
By the way, the zipper isn't difficult at all, and believe it or not, it's handsewn.


I highly recommend this pattern!
It's cute, fun, functional and feminine.
 I've got 3 others in the works, although I still have so many other things to do :)